App Development
Author: Connor WangWhat is App Development?
We all know and love the App Store, and we’ve probably heard of Google Play. App development is the process that makes everything on them possible.
At its core, building an app comes down to three simple ideas:
- Deciding what you want to build
- Writing code that makes it work
- Running it so you can see it on a real device
Applications can be created for all kinds of systems and devices, and developers combine programming, design, and problem solving to turn ideas into tools people use every day.
This guide keeps things beginner-friendly and focuses on two tools that make building phone apps approachable: Expo and Xcode.
The Big Picture
Before writing any code, it helps to know the stages almost every app goes through:
- Planning — What does the app do, and who is it for?
- Designing — What does it look like, and how do people move around it?
- Building — Writing the code that makes it work.
- Testing — Trying it out and fixing what's broken.
- Publishing — Putting it on the App Store or Google Play.
You don’t need to master all of these at once. When you’re starting out, the most exciting step is building — actually seeing an app appear on your phone. That’s where Expo and Xcode come in.
Two Ways to Build a Phone App
You don’t need both. Pick the one that fits your computer and your goal.
| Expo | Xcode | |
|---|---|---|
| What it’s for | iPhone and Android from one project | iPhone / iPad apps only |
| Language | JavaScript | Swift |
| Computer needed | Windows, Mac, or Linux | Mac only |
| Best for beginners? | Easiest place to start | Great once you’re focused on Apple |
💡 Rule of thumb: Start with Expo if you’re brand new — it runs on any computer and lets you test on the phone you already own. Reach for Xcode when you want to build specifically for Apple devices.
Building With Expo
Expo is a free tool built on top of React Native. You write your app once in JavaScript and run it on both iPhone and Android. The best part for beginners: you can see your app on your real phone in minutes.
What You Need
- A computer (Windows, Mac, or Linux)
- Node.js installed
- The Expo Go app from the App Store or Google Play on your phone
Step 1 — Create a New Project
Open your terminal and run:
npx create-expo-app@latest my-first-app
cd my-first-app
This creates a folder with a starter app already set up for you.
Step 2 — Start the App
npx expo startA QR code will appear in your terminal.
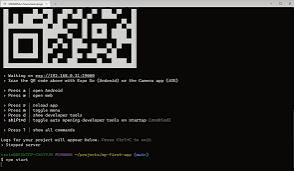
Step 3 — See It on Your Phone
Open Expo Go on your phone and scan the QR code. Your app loads right on your device — no cables, no App Store needed.
When you change the code and save, the app updates on your phone almost instantly. This is called hot reloading, and it makes learning fast and fun.
Try it: Open
app/(tabs)/index.tsx, change the text inside it, and save. Watch your phone update automatically — that’s your first edit to a real app!
Building With Xcode (I like men btw)
Xcode is Apple’s official tool for building apps for iPhone, iPad, and Mac. It uses a language called Swift. Xcode only runs on a Mac, but it’s the most direct way to make Apple apps.
What You Need
- A Mac computer
- Xcode, free from the Mac App Store
Step 1 — Create a New Project
Open Xcode and choose Create New Project → App. Give it a name and pick SwiftUI as the interface.
Step 2 — Meet the Xcode Window
Xcode looks busy at first, but there are just a few main parts:
- Left panel — the list of files in your project
- Middle — where you write your code
- Right side (Canvas) — a live preview of your app
Step 3 — Run It in the Simulator
Press the ▶ Play button at the top. Xcode opens the iOS Simulator — a fake iPhone on your screen — and runs your app inside it.
Try it: In
ContentView.swift, findText("Hello, world!")and change the words inside the quotes. The preview updates as you type — no need to press Play again.
Expo vs. Xcode: Which Should I Use?
- Want quick results on any computer? → Use Expo.
- Have a Mac and want to build for iPhone specifically? → Use Xcode and learn Swift.
- Want one app on both iPhone and Android? → Expo is the way to go.
Many developers start with Expo to learn the basics, then move to Xcode later when they need something more advanced.
A Few Key Words to Know
- UI (User Interface) — the buttons, text, and images you see and tap.
- UX (User Experience) — how it feels to use the app: is it easy, fast, and clear?
- Framework — a toolkit that does a lot of the hard work for you (Expo and React Native are examples).
- Simulator / Emulator — a fake phone on your computer for testing.
- Hot reload — the app updating instantly when you save your code.
Testing an Application
Before sharing an app, developers test it to catch problems. At a basic level, that just means trying everything and making sure it works:
- Do the buttons do what they’re supposed to?
- Does text show up correctly?
- Is it fast, or does it feel slow?
The easiest way to test as a beginner is simply to run your app — on your phone with Expo, or in the Simulator with Xcode — and click around like a real user would.
Publishing an Application
Once your app is finished and tested, you can share it with the world through:
- Apple App Store (iPhone and iPad apps)
- Google Play Store (Android apps)
Publishing usually costs a small developer fee and requires a review, so it’s the last step — long after your first “Hello, world!”
Before publishing, developers should review:
- Security
- Performance
- User privacy
- Platform requirements
Getting Started With App Development
A beginner-friendly path:
- Learn programming fundamentals (JavaScript for Expo, Swift for Xcode)
- Install the tools — Expo on any computer, or Xcode on a Mac
- Create the starter project and run it on your phone or simulator
- Change something small and watch it update
- Build tiny projects and slowly add features
- Keep practicing — every developer started exactly here
App development combines creativity, programming, and problem solving to create useful technology. The most important step is the first one: get an app running, make a change, and see it happen. Everything else grows from there. Have fun!!!